Qt5 JavaScript Filter
This guide covers how to do some rapid prototyping. Instead of setting up a complete C++ project with CMake and Visual Studio and spending a lot of time recompiling C++ code you can use a subset of the ADTF C++ API in JavaScript directly.
After reading this guide, you will know how to:
- define stream types
- read and write samples
- access sample content
The basics
The Qt5 JavaScript Filter and the Qt5 QML Filter provide access to ADTF Filter functionality by writing JavaScript code which can be embedded in a Filter Graph. While the Qt5 JavaScript Filter works synchronously in the trigger pipe, the Qt5 QML Filter triggers are handled by the Qt GUI thread, meaning they are asynchronous. Additionally, the Qt5 QML Filter offers an easy way to implement simple graphical user interfaces and data visualization elements. This tutorial focuses on the Qt5 JavaScript Filter which wraps the functionality of the QJSEngine from the Qt framework.
We are going to create a small ADTF Session that has a Qt5 JavaScript Filter, that processs the output of two Filters and creates Samples that contain data from both inputs. We visualise the output with a Qt5 Media Description Display.
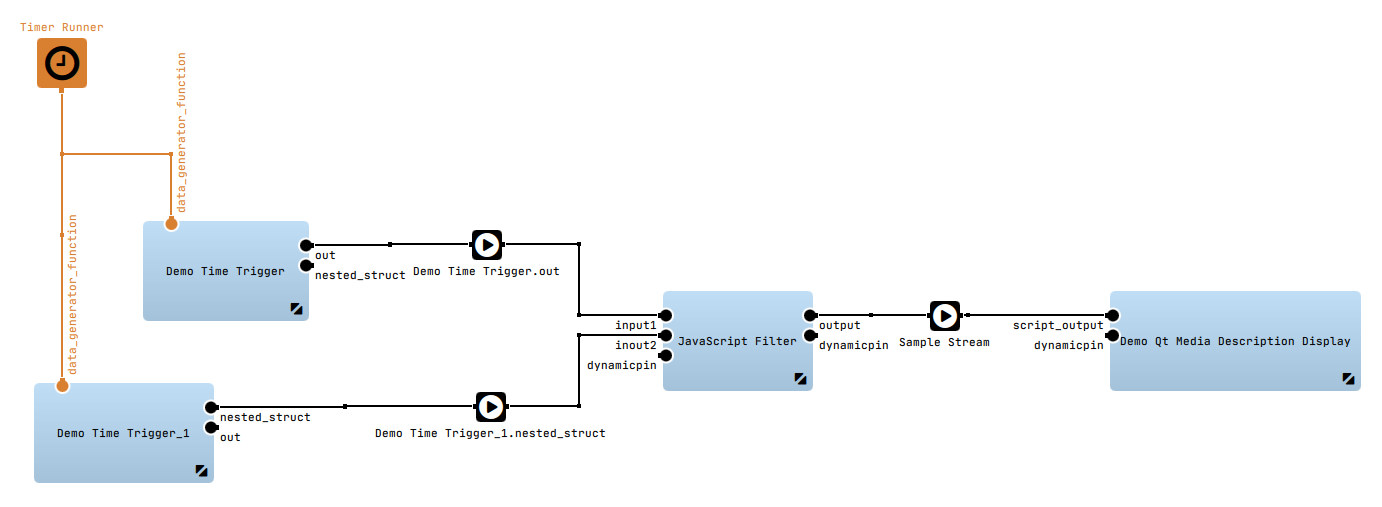
Open the context menu of the Filter by performing a right click on the Filter. Click on "Open Editor". This will open the JavaScript Editor where you can start writing JavaScript code. Paste the following code and save it.
// first we start of with creating our inputs
var input1 = filter.createInputPin("input1")
var input2 = filter.createInputPin("input2")

// the types object offers several methods to define stream types.
// here we use the createDefinition call were we can build our
// output data description.
var output_type = types.createDefinition("guide_output")
                  .add("value_from_input1", "tFloat32")
                  .add("value_from_input2", "tFloat32")

// note that you can also use types.getDefinition() to retrieve a
// media description from the Media Description Service

// and create an output pin
var output = filter.createOutputPin("output", output_type)

// we connect a callback to the "sample" signal of the first input.
// note that there is also a "trigger" signal available, there you
// can iterate over all available samples with input1.getNextSample()
input1.sample.connect(function(sample1)
{
    // we try to get the last sample from input2
    var sample2 = input2.getLastSample()
    if (sample2)
    {
        // input sample data is available in the .data object of the sample. If there is a
        // media description available this .data object has all elements available as (sub)properties.
        // to write data, we just create an object with all the values and pass it on.
        // note that types are converted on-the-fly.
        output.write(sample1.timestamp, { value_from_input1: sample1.data.value,
                                          value_from_input2: sample2.data.sHeaderStruct.ui32HeaderVal })
    }
    else
    {
        // you can use the standard javascript "console" object
        console.info("no sample from input2 available")
    }
})
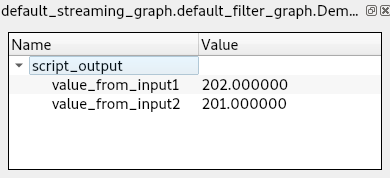
We can then start the ADTF Session and observe the output of our Scripting Filter:
Where to go next?
Have a look at the Qt5 QML Filter to learn how to visualize data with QML and JavaScript.