Getting started
This chapter will break down the use of the ADTF Calibration Toolbox 3. After reading this guide, you will know:
- where the delivered example sessions are located
- how you can start and use the delivered configuration
- how you can build your own configuration for the purpose of the XCP communication
Where do I find the delivered example sessions?
We provide an example project in order to show the use cases of several filters provided in this toolbox. The project contains several ADTF sessions for different use cases.
Demo XCP Substreams
Shows the use of the Substreams of the XCP Master Filter.xcp_on_eth_Master
Shows the use of 'XCP over Ethernet'xcp_on_eth_Slave
Counterpart to the xcp_on_eth_Masterxcp_without_transportlayer
It uses the XCP Emulator Filter to emulate an example ECU, so you do not need to have a real ECU available to test it.xcp_decode_example
Show the use of the delivered Xcp Demo Decode and Encode Filter.
How can I start these sessions and what is their purpose?
The following sections will describe, how you can use the delivered sessions and their purposes.
In general, the sessions can be started in different ways.
But we recommend to start them with the ADTF GUI Control, therefor you have to follow these steps:
- Start your ADTF GUI Control ($ADTF_FOLDER/bin/adtf_guicontrol.exe)
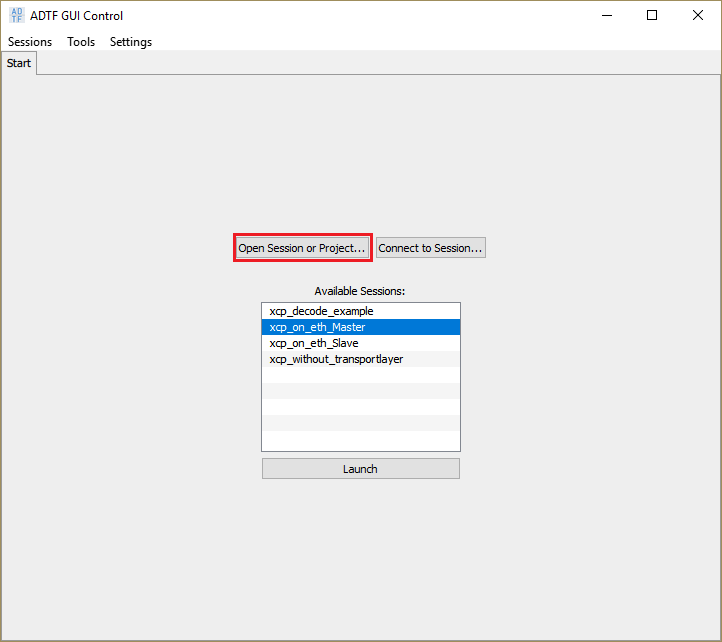
Open the above mentioned ADTF-Project (calibrationtoolbox.adtfproject)
-
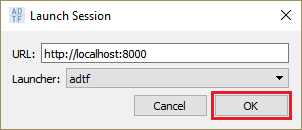
By selecting one of the listed sessions you will be asekd, what URL should be used. Simply use the default-values.
-
Now you can directly set your session in the 'initialized' and 'running' - state
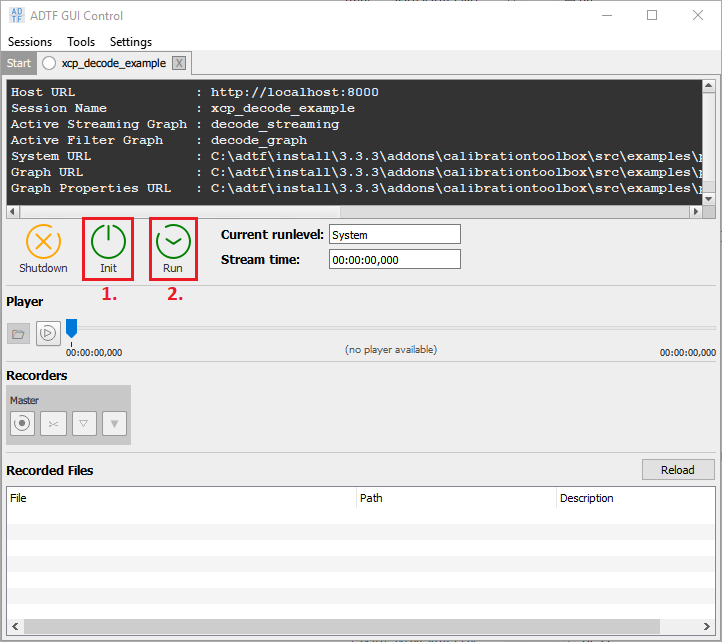
- Your session is now running
-
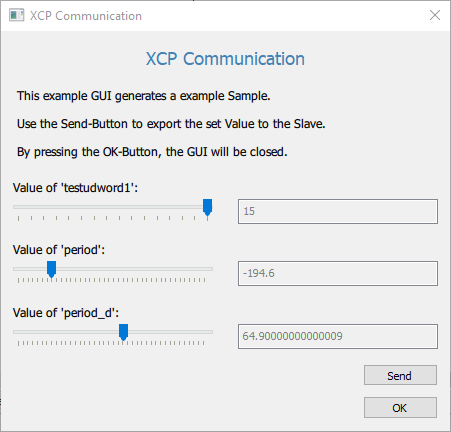
xcp_on_eth_Masterandxcp_on_eth_SlaveThis section will explain you, how you can connect two ADTF-Sessions with the help of the 'XCP on Ethernet' - Components. Our Master-Session includes the XCP-Master-, XCP-Decoder- and the necessary XCP-Encoder-Filter in his filter graph. These filters are used to de- and encode the XCP frames. For easy generation of example values, we deliver a QtQick-Filter (the XCP Communication). For the communication with the slave, which contains the ECU, we use in the streaming graph the delivered XCP On Ethernet Receiver and Transmitter.
If both sessions are running, the master sessions 'sends' your new values via the transmitter to the ECU (within the slave session). This virtual ECU processes the received values and gives the master session a reply.
But how can we start two sessions?
 Go the same way as described above, but stop at point 3. Now it's important to use a unique URL for the second session (because port 8000 is already in use).
For example use:
Go the same way as described above, but stop at point 3. Now it's important to use a unique URL for the second session (because port 8000 is already in use).
For example use:
- xcp_on_eth_Master session: http://localhost:8000
- xcp_on_eth_Slave session: http://localhost:8100
At first you have to start the xcp_on_eth_Slave session, before you can start the xcp_on_eth_Master session. Otherwise you will get a failure, which mentions that the master session cannot establish a connection to the ECU.
If both sessions are running your are able to use the 'XCP Communication' window to generate and send values to the virtual ECU. Just play around with the example values (testudword1, period, period_d) and hit 'Send'.
Thanks to the open Mediadescription displays, you are able to see all the values, that are transmitted.
This is the way, how you can calibrate and read values of an ECU via the 'XCP on Ethernet' components. -
xcp_without_transportlayerYou can follow the way described above. But you have to start only the
xcp_without_transportlayersession. This configuration could be useful, if you would like to test your own written XCP-Emulator.
Building a working configuration
If you would like to build your own configuration, you can follow these steps:
- Start with adding the transport sink (e.g. XCP On Ethernet Transmitter) or source (e.g. XCP On Ethernet Receiver) of your choice to the streaming graph and configure it. This depends on the properties of the used bus device (in case of ethernet: IP addresses, ports etc.). Note that if this information is specified in the A2L file you do not have to specify them explicitly.
- Add the XCP Master Filter, XCP Decode Filter and XCP Encode Filter to your filter graph.
- Set the 'A2L or Xml Filename' property of the XCP Master Filter to your A2L File.
- It is important that you connect the xcp_master-Pin of the XCP Master Filter with a 'Binding Proxy' inputpin.
- The output pin of this Binding Proxy has to be connected with the 'xcp_master' input pin of your XCP Encode Filter and XCP Decode Filter
- Right click on the XCP Encode Filter and XCP Decode Filter and select 'Signal Config Filter Editor'. Here you can create your custom configuration. (see SCFE)
- Alternatively you can specify your existing mapfile via the 'MapFilename' Property of the De/Encode-Filter.
- Connect the 'slave_xcp_frames' input pin of the XCP-Master-Filter with the 'xcp_frames' pin of the transport device (the sink/source inside the filter graph) and vice versa.
- Now you're ready to go. If the initialization fails make sure that you check the Console Log for additional error messages!