Place a Filter between a Streaming Sink and a Streaming Source
Connect the input of a Streaming Source with the Filter
Filter some samples of the Streaming Source so that they do not reach the Streaming Sink
Connect the output of the Filter with a Streaming Sink
Create the CMakeLists.txt
For this example we create a simple Filter which has a poperty that defines some characters that will be filterd from a stream of charcters.
The CMakeLists.txt looks like this:
cmake_minimum_required(VERSION 3.18 FATAL_ERROR)
project (CharacterFilterProject)

set (HAPPY_CHARACTER_FILTER happy_character_filter)

if(NOT EXISTS ${CMAKE_CURRENT_SOURCE_DIR}/happy_character_filter.h)
  file(WRITE happy_character_filter.h)
endif()
if(NOT EXISTS ${CMAKE_CURRENT_SOURCE_DIR}/happy_character_filter.cpp)
  file(WRITE happy_character_filter.cpp)
endif()

find_package(ADTF COMPONENTS filtersdk)

# Adds the happy_character_filter project to the Visual Studio solution, which when build
# creates a shared object called happy_character_filter.adtfplugin
adtf_add_filter(${HAPPY_CHARACTER_FILTER} happy_character_filter.h happy_character_filter.cpp)

# Adds the INSTALL project to the Visual Studio solution, which when build
# copies our Filter to the subdirectory given as the second argument into ${CMAKE_INSTALL_PREFIX}
adtf_install_filter(${HAPPY_CHARACTER_FILTER} src/examples/bin)

# Generate a plugindescription for our Filter
adtf_create_plugindescription(
    TARGET ${HAPPY_CHARACTER_FILTER}
    PLUGIN_SUBDIR "src/examples/bin"
    VERSION "0.8.15"
    LICENSE "ADTF"
    SUPPORT_MAIL "support@mycompany.org"
    HOMEPAGE_URL "www.mycompany.org"
)

# Generate a documentation for our Filter
adtf_convert_plugindescription_to_dox(
    TARGET ${HAPPY_CHARACTER_FILTER}
    DIRECTORY ${CMAKE_BINARY_DIR}/src/doxygen/generated
)
Use the CMake-GUI to configure relevant properties
Switch to the CMake-GUI and follow these steps:
Run your cmake-gui.exe to open the graphical user interface
Fill in where CMake can find your source code (and the created CMakeLists.txt file)
Fill in a build folder (this is where all the build stuff goes)
Press the Configure button
Expand the entry Ungrouped Entries and you will see that the value for the variable ADTF_DIR is not set.
To fix this click into the "Value" column and fill in the path to your ADTF directory.
Expand the entry CMAKE and search for the variable CMAKE_INSTALL_PREFIX.
By default this variable points to an absolute path with administration privileges which can be a problem.
Set the variable also to your ADTF directory e.g. C:/ADTF/x.y.z.
Avoid using admin-permission directories. This can cause CMake to fail due to missing permissions.
Once again click the Configure button
Now you should get the "Configuring done" log message and you can click the Generate button
If everything is fine you get the "Generating done" log message. Click the Open Project button to start Visual Studio
If you have any problems during this phase have a look at ADTF related CMake
Implement the Filter inside Visual Studio
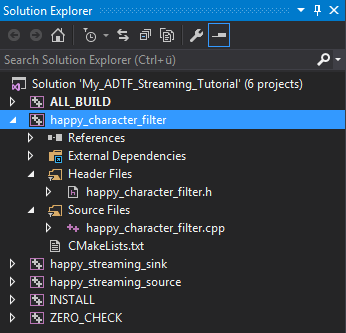
Open the happy_character_filter project in the solution explorer which should look like this: Visual Studio solution explorer
Open the happy_character_filter.h file and add this Filter declaration:
#pragma once

// Include all necessary headers from the ADTF SDK
#include <adtffiltersdk/adtf_filtersdk.h>

// For simplicity use the necessary namespaces
using namespace adtf::util;
using namespace adtf::ucom;
using namespace adtf::base;
using namespace adtf::streaming;
using namespace adtf::mediadescription;
using namespace adtf::filter;

// A very simple filter which removes characters which match a given pattern.
// To implement a Filter, subclass adtf::filter::cFilter
class cHappyCharacterFilter: public cFilter
{
public:
    // This macros provides some meta information about our Filter Implementation
    // This will be exposed by the plugin class factory.
    ADTF_CLASS_ID_NAME(cHappyCharacterFilter,
                       "happy_character_filter.filter.adtf_guides.cid",
                       "Happy Character Remover");

public:
    // We setup Pins in the constructor
    cHappyCharacterFilter();

    // This method will be called when a trigger occours via our input Pin.
    tResult ProcessInput(ISampleReader* pReader,
                         const iobject_ptr<const ISample>& pSample) override;

private:
    bool FilterCharacter(char nIn);

    // A property variable always reflects the value of a Property
    property_variable<cString> m_strFilterPattern;

    // A writer where we forward filtered characters.
    ISampleWriter* m_pWriter;
};
Open the happy_character_filter.cpp file and add this Filter definition:
#include "happy_character_filter.h"

// The code behind the macro creates a plugin and the main entries to the plugin DLL or shared object.
// The cHappyCharacterFilter will be available through the plugins class factory.
ADTF_PLUGIN("Happy Character Filter Plugin",
            cHappyCharacterFilter);

// this is our input and output data
struct tSimple
{
    char cValue;
};

cHappyCharacterFilter::cHappyCharacterFilter()
{
    // create a type definition from our existing struct definiton
    auto oStructureDefiniton = structure<tSimple>("tSimple")
                               .Add("cValue", &tSimple::cValue);

    // an Input Pin
    CreateInputPin("charIn", oStructureDefiniton);
    SetDescription("charIn", "Incoming value");

    // and an Output Pin
    m_pWriter = CreateOutputPin("charOut", oStructureDefiniton);
    SetDescription("charOut", "Outcoming value");

    // make sure our Property Variable is in sync with a Property.
    m_strFilterPattern.SetDescription("Pattern to filter characters");
    RegisterPropertyVariable("pattern", m_strFilterPattern);

    // set basic information about the component itself and purpose
    SetDescription("This filter shows how to cut characters defined by properties within a stream.");
}

tResult cHappyCharacterFilter::ProcessInput(ISampleReader* /*pReader*/,
                                            const iobject_ptr<const ISample>& pSample)
{
    // We use the sample_data template to access the data stored within the sample
    // This behaves just like a tSimple pointer.
    sample_data<tSimple> oData(pSample);

    if (FilterCharacter(oData->cValue))
    {
        // this will initialize a new sample from the incoming sample.
        output_sample_data<tSimple> oOutputData(pSample);
        // we replace the filtered character.
        oOutputData->cValue = '_';
        // and write it to the connected sample stream.
        m_pWriter->Write(oOutputData.Release());
    }
    else
    {
        // otherwise we just forward the Sample.
        m_pWriter->Write(pSample);
    }

    RETURN_NOERROR;
}

bool cHappyCharacterFilter::FilterCharacter(char nIn)
{
    if (m_strFilterPattern->Find(nIn) != cString::InvalidPos)
    {
        // Received character is part of the filter pattern, so we remove it!
        LOG_INFO(">> %c << filtered", nIn);
        return true;
    }
    else
    {
        LOG_INFO(">> %c << not filtered", nIn);
        return false;
    }
}
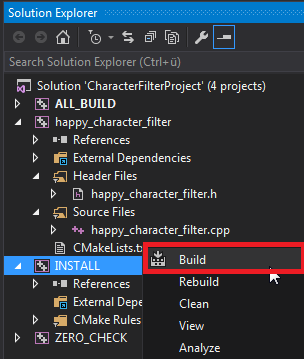
Build the "CharacterFilterProject" solution with Visual Studio to get the shared object *.adtfplugin Build the solution
Build the "INSTALL" project with Visual Studio (this step deploys the created *.plugindescription files) Build the INSTALL project
Now you have a brand new character Filter which compares the received character from the incoming sample stream against a chracter pattern
held by the Filter as a configurable property. If the pattern contains the received character it is replaced by the underscore character.
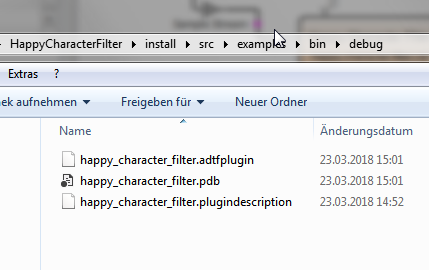
You can find the generated happy_character_filter.adtfplugin and happy_character_filter.plugindescription in the
src\examples\bin\debug folder of your ADTF directory. Generated files
Build an ADTF Session for our new Filter
Fire up the Configuration Editor
Create a new project
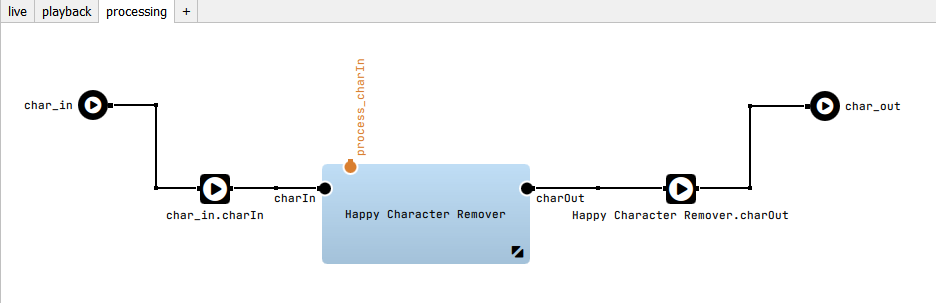
Switch to the processing Filter Graph
Create a Filter Graph that looks like this
Drag and drop the Happy Character Remover Filter.
Add a data inport using context menu.
Add a data outport using context menu.
Connect the ports and the Filter to each other, if enabled in your settings, ADTF will automatically add Sample Streams where required (default setting)
Filter Graph - processing
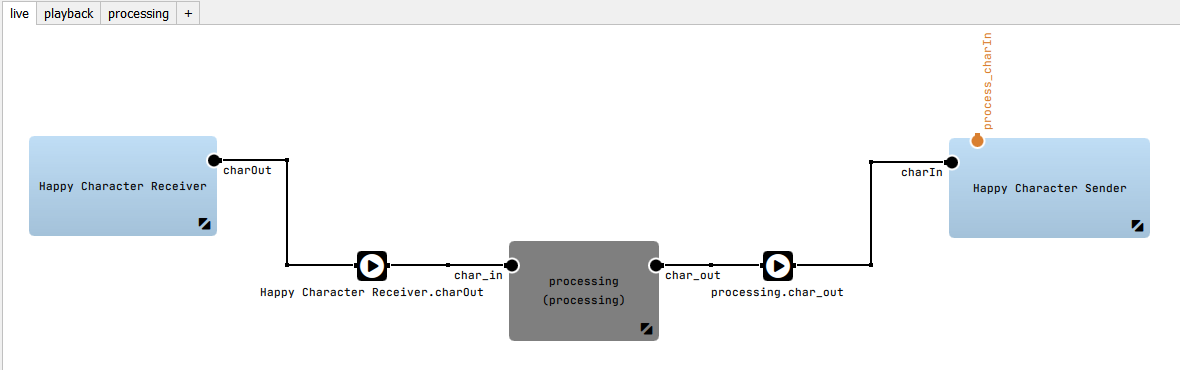
Switch to the live Filter Graph
Create a Filter Graph that looks like this
Drag and drop the Happy Character Receiver Streaming Source.
Drag and drop the Happy Character Sender Streaming Sink.
Add processing as subgraph using context menu.
Connect them to the related ports of the included Subgraph processing, if enabled in your settings, ADTF will automatically add Sample Streams where required (default setting)
Filter Graph - live
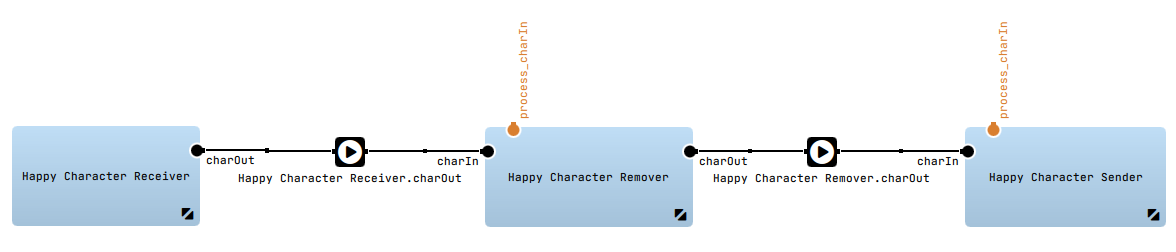
Of course this is an easy setup and you can connect Streaming Source, Streaming Sink and Filter directly inside a single Filter Graph:
Filter Graph - Single solution
But we like to encourage you to separate your Filter Graphs for better overview, maintainance and reusability.
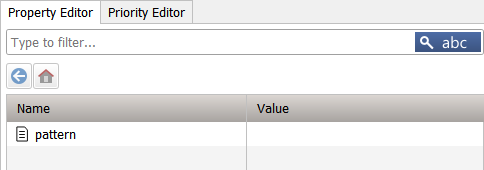
Select the "Happy Character Filter" and edit the "pattern" property. This property defines which chars are filtered by the Filter.
Filter Graph
Save the project ctrl + s
Switch to the Session Editor tab and make sure, that Filter Graph live is set
Hit F5 to launch the Session
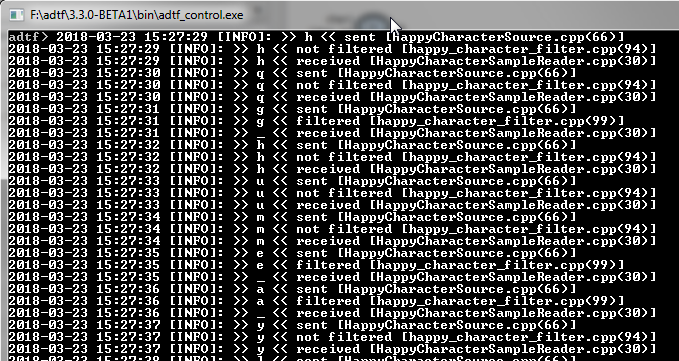
In the command line of the ADTF Control type rl running Filter output
Congratulations! Now you know how to Filter samples from a stream by settings a Filter between a Streaming Source and a Streaming Sink.