Data Processor Filter Tutorial
This guide covers creating a first simple ADTF Filter that receives and processes data and logs it to the console. After reading this guide, you will:
- know the structure of a simple ADTF Filter
- know how to create a simple ADTF Filter
- know how to read, modify and send data in ADTF
Where are we?
In the CMake Tutorial we created an empty ADTF Filter using CMake. We furthermore created a Visual Studio solution containing our empty Filter.
Create an ADTF Filter project
To create a CMake based project all you have to do is provide a CMakeLists.txt file inside the folder where your source files are. Setting up
a valid CMakeLists.txt file includes the following steps:
As the official CMake tutorial suggests we define a minimal version of CMake using the cmake_minimum_required macro. So we can make sure that
the installed version of CMake on the computer supports all the macros we are going to use.
We give the Visual Studio solution to be created a name by issuing the project macro with the desired name and remember the name of the Filter
we want to create in a variable using the set macro. Next, we create the header and source file for the Filter if they do not exist yet.
To successfully create a new ADTF Project we need to tell CMake where it can find the ADTF directory. We do this by using the find_package
statement which makes headers, libraries and additional CMake macros of the ADTF SDK available.
When we build our project we want to get a shared object with a .adtfplugin extension because this is what we can
deploy to the ADTF runtime. To accomplish this we use the adtf_add_filter macro. The parameters of this macro are the name of the Filter
and the source, header files of the Filter.
The macro adtf_install_filter adds the INSTALL project to the Visual Studio solution and copies all Filter related files to the given installation
folder. An appropriate installation folder would be src/examples/bin inside an ADTF directory, because this folder is recognized by the
Configuration Editor so the Filter will be instantly available after a restart of the Configuration Editor.
Last but not least we have to call the adtf_create_plugindescription CMake function to generate an XML description of the Filter
(For more information see Plugindescription Generator) and adtf_convert_plugindescription_to_dox
to create a documentation out of it.
This file tells the Configuration Editor what are the capabilities of the Filter. The function uses theADTF_DIRvariable which
is one of the variable you will have to set in the CMake configure step.
cmake_minimum_required(VERSION 3.18 FATAL_ERROR)
project (DataProcessor)

set (DATA_PROCESSOR_FILTER tutorial_filter_data_processor)

if(NOT EXISTS ${CMAKE_CURRENT_SOURCE_DIR}/tutorial_filter_data_processor.h)
  file(WRITE tutorial_filter_data_processor.h)
endif()
if(NOT EXISTS ${CMAKE_CURRENT_SOURCE_DIR}/tutorial_filter_data_processor.cpp)
  file(WRITE tutorial_filter_data_processor.cpp)
endif()

find_package(ADTF COMPONENTS filtersdk)

# Adds the data_processor_filter project to the Visual Studio solution, which when build
# creates a shared object called data_processor_filter.adtfplugin
adtf_add_filter(${DATA_PROCESSOR_FILTER} data_processor_filter.h data_processor_filter.cpp)

# Adds the INSTALL project to the Visual Studio solution, which when build
# copies our Filter to the subdirectory given as the second argument into ${CMAKE_INSTALL_PREFIX}
adtf_install_filter(${DATA_PROCESSOR_FILTER} src/examples/bin)

# Generate a plugindescription for our Filter
adtf_create_plugindescription(
    TARGET ${DATA_PROCESSOR_FILTER}
    PLUGIN_SUBDIR "src/examples/bin"
    VERSION "0.8.15"
    LICENSE "ADTF"
    SUPPORT_MAIL "support@mycompany.org"
    HOMEPAGE_URL "www.mycompany.org"
)

# Generate a documentation for our Filter
adtf_convert_plugindescription_to_dox(
    TARGET ${DATA_PROCESSOR_FILTER}
    DIRECTORY ${CMAKE_BINARY_DIR}/src/doxygen/generated
)
Now use the CMake-GUI to fill in all the information required by CMake to create the Visual Studio solution.
If you need help have look on how to use the CMake-GUI.
Then open thedata_processor_filterproject in the solution explorer.
Now we want our Filter to receive and modify data
More precisely our Filter should:
- receive two data samples containing a velocity and a yaw rate value
- use those values to calculate a kappa value
- log some kappa values to the console
- send all kappa values to a data sink
How to create a simple data processor Filter?
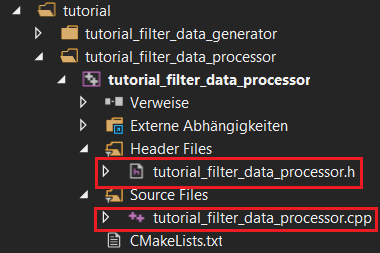
Open the tutorial_filter_data_processor header and source files in Visual Studio.
The header file of the Filter
At first we ensure there is just a single tutorial_filter_header_file.h header file.
/**
 *
 * ADTF Tutorial filter for data processing
 *
 */
#pragma once

// Include all necessary headers from the ADTF SDK
#include <adtffiltersdk/adtf_filtersdk.h>

// For simplicity use the necessary namespaces
using namespace adtf::util;
using namespace adtf::ucom;
using namespace adtf::base;
using namespace adtf::streaming;
using namespace adtf::mediadescription;
using namespace adtf::filter;

// Now we declare a new class cTutorialFilterDataProcessor that
// inherits from cFilter. This will be our Tutorial Filter.
class cTutorialFilterDataProcessor: public cFilter
{
public:
    // Inside the class declaration we use an ADTF macro to enable correct treatment
    // of class identifier and class name by IClassInfo and the class factories.
    ADTF_CLASS_ID_NAME(cTutorialFilterDataProcessor,
                       "tutorial_data_processor.filter.adtf_guides.cid",
                       "Tutorial Data Processor");

public:
    // We implement the constructor where we create our Pins.
    cTutorialFilterDataProcessor();

    // We override the ProcessInput method, that we configure to be called each time a trigger occures via one input Pin.
    tResult ProcessInput(tNanoSeconds tmTrigger, ISampleReader* pReader) override;

private:
    ///Readers to read data samples from our input Pins.
    ISampleReader* m_pVelocityReader;
    ISampleReader* m_pYawRateReader;

    ///Writer to write data samples to out output Pin.
    ISampleWriter* m_pKappaWriter;
};
The source file of the Filter
We declared the necessary functions in the header file. Now we need to
implement them in the tutorial_filter_data_processor.cpp source
file.
/*
 *
 * ADTF Tutorial Filter for data processing
 *
 */
#include "tutorial_filter_data_processor.h"

// The code behind the macro creates a plugin and the main entries to the plugin DLL or shared object.
// The cTutorialFilterDataProcessor class will be available through the plugins class factory.
ADTF_PLUGIN("ADTF Tutorial Filter Data Processor Plugin", cTutorialFilterDataProcessor);

cTutorialFilterDataProcessor::cTutorialFilterDataProcessor()
{
    // create our inputs
    m_pVelocityReader = CreateInputPin("velocity", stream_type_plain<float>());
    SetDescription("velocity", "Incoming velocity value for calculation (kappa = yawrate / velocity)");

    // mind the third parameter which disables trigger forwarding from this input pin to our ProcessInput method.
    m_pYawRateReader = CreateInputPin("yawrate", stream_type_plain<float>(), false);
    SetDescription("yawrate", "Incoming yawrate value for calculation (kappa = yawrate / velocity)");

    // and our output
    m_pKappaWriter = CreateOutputPin("kappa", stream_type_plain<float>());
    SetDescription("kappa", "Calculated kappa value (kappa = yawrate / velocity)");

    // set basic information about the component itself and purpose
    SetDescription("This filter shows how to receive data and calculate new output from input.");
}

// This function will be executed each time a trigger occurs via the "velocity" input Pin
// We have also enabled Trigger forwarding from the "velocity" pin to "kappa".
// So after this method has finished, the trigger will be forwarded via the output Pin and
// all connected Filters will get a chance to handle to it.
tResult cTutorialFilterDataProcessor::ProcessInput(tNanoSeconds /*tmTrigger*/,
                                                   ISampleReader* /*pReader*/)
{
    // First of all get the last available yaw rate sample
    object_ptr<const ISample> pYawRateSample;
    if (IS_OK(m_pYawRateReader->GetLastSample(pYawRateSample)))
    {
        // We use the sample_data template to access the data stored within the sample
        // This behaves just like a float
        sample_data<float> fYawRate(pYawRateSample);

        // Then we iterate over all available velocity samples
        object_ptr<const ISample> pVelocitySample;
        while (IS_OK(m_pVelocityReader->GetNextSample(pVelocitySample)))
        {
            // Once again use sample_data to access the data.
            sample_data<float> fVelocity(pVelocitySample);

            // And keep us informed.
            LOG_INFO("Received fVelocity: %f, fYawRate: %f",
                     static_cast<float>(fVelocity),
                     static_cast<float>(fYawRate));

            // To create output data use the output_sample_data template
            // This will handle sample allocation for you and you can use it just
            // like its template parameter type.
            output_sample_data<float> fKappa(fVelocity.GetTimeNs());

            // Perform our sophisticated calculation.
            fKappa = fYawRate / fVelocity;

            // Write it to the connected sample stream.
            // Do not call any methods of output_sample_data after you have called Release() which
            // hands over the sample instance.
            m_pKappaWriter->Write(fKappa.Release());
        }
    }

    RETURN_NOERROR;
}
Finally we need to build the Project.
Whats missing right now is the data to process. We need to create a data source.
Where to go next?
Have a look at the Filter Generator Tutorial to learn how to create a simple Filter that generates and sends data in ADTF.