My First Filter
This guide teaches you how to wire up your own Filter by following three simple steps. If you are looking for a more comprehensive explanation of what Filters are follow this link.
- Use CMake and the available ADTF-CMake-Macros to create a Filter project
- Write the scaffolding C++ code for a Filter
- Create a simple ADTF Session that makes use of the newly created Filter
Create the CMakeLists.txt
To create a CMake based project all you have to do is provide a CMakeLists.txt file inside the folder where your source files live. Setting up
a valid CMakeLists.txt file includes the following steps:
-
As the official CMake tutorial suggests we define a minimal version of CMake using the
cmake_minimum_requiredmacro. So we can make sure that the installed version of CMake on the computer supports all the macros we are going to use. -
We give the Visual Studio solution to be created a name by issuing the
projectmacro with the desired name and remember the name of the Filter we want to create in a variable using thesetmacro. - Next we create the header and source file for the Filter if they do not yet exist.
-
To successfully create a new ADTF Project we need to tell CMake where it can find the ADTF directory. We do this by using the
find_packagestatement which makes headers, libraries and additional CMake macros of the ADTF SDK available. -
When we build our project we want to get a shared object with a
.adtfpluginextension because this is what we can deploy to the ADTF runtime. To accomplish this we use theadtf_add_filtermacro. The parameters of this macro are the name of the Filter and the source, header files of the Filter. -
The macro
adtf_install_filteradds the INSTALL project to the Visual Studio solution and copies all Filter related files to the given installation folder. An appropriate installation folder would besrc/examples/bininside an ADTF directory, because this folder is recognized by the Configuration Editor so the Filter will be instantly available after a restart of the Configuration Editor. -
Afterwards,
adtf_create_plugindescriptionis called to generate an XML description of the Filter (For more information see Plugindescription Generator). This file tells the Configuration Editor what the capabilities of the Filter are. The macro takes several parameters but only TARGET for the name of the Filter and PLUGIN_SUBDIR for a path to the installation folder which will contain the.adtfpluginand.plugindescriptionfiles are mandantory. Of course there are many optional additional parameters possible, we recommend using- VERSION - for compatibility checks
- LICENSE - to make your customer the usage clear
- SUPPORT_MAIL - for detailed help
- HOMEPAGE_URL - to provide additional information or documentation for the adtfplugin or your company
-
Last but not least we can use
adtf_convert_plugindescription_to_doxto extract the information of the entire.adtfpluginand from the former generated.plugindescriptionand create a.doxfile for use within your doxygen documentation.
For further information regarding relation of adtfplugin, plugindescription and CMake please have a look at Generate Plugin Description.
cmake_minimum_required(VERSION 3.18 FATAL_ERROR)
project (HelloWorld)

set (HELLO_WORLD_FILTER hello_world_filter)

if(NOT EXISTS ${CMAKE_CURRENT_SOURCE_DIR}/hello_world_filter.h)
  file(WRITE hello_world_filter.h)
endif()
if(NOT EXISTS ${CMAKE_CURRENT_SOURCE_DIR}/hello_world_filter.cpp)
  file(WRITE hello_world_filter.cpp)
endif()

find_package(ADTF COMPONENTS filtersdk)

# Adds the hello_world_filter project to the Visual Studio solution, which when build
# creates a shared object called hello_world_filter.adtfplugin
adtf_add_filter(${HELLO_WORLD_FILTER} hello_world_filter.h hello_world_filter.cpp)

# Adds the INSTALL project to the Visual Studio solution, which when build
# copies our Filter to the subdirectory given as the second argument into ${CMAKE_INSTALL_PREFIX}
adtf_install_filter(${HELLO_WORLD_FILTER} src/examples/bin)

# Generate a plugindescription for our Filter
adtf_create_plugindescription(
    TARGET ${HELLO_WORLD_FILTER}
    PLUGIN_SUBDIR "src/examples/bin"
    VERSION "0.8.15"
    LICENSE "ADTF"
    SUPPORT_MAIL "support@mycompany.org"
    HOMEPAGE_URL "www.mycompany.org"
)

# Generate a documentation for our Filter
adtf_convert_plugindescription_to_dox(
    TARGET ${HELLO_WORLD_FILTER}
    DIRECTORY ${CMAKE_BINARY_DIR}/src/doxygen/generated
)
\includedoc
adtf_convert_plugindescription_to_dox(
    TARGET ${HELLO_WORLD_FILTER}
    DIRECTORY ${CMAKE_BINARY_DIR}/src/doxygen/generated
    DISABLE_VALIDATION
    COMPACT
)
Use the CMake-GUI to configure relevant properties
Switch to the CMake-GUI and follow these steps:
-
Run your
cmake-gui.exeto open the graphical user interface -
Fill in where CMake can find your source code (and the created
CMakeLists.txtfile) -
Fill in a
buildfolder (this is where all the build stuff goes) -
Press the
Configurebutton -
Expand the entry
Ungrouped Entriesand you will see that the value for the variableADTF_DIRis not set. To fix this click into the "Value" Column and fill in the path to your ADTF directory. -
Expand the entry
CMAKEand search for the variableCMAKE_INSTALL_PREFIX. By default this variable points to an absolute path with administration privileges which can be a problem. Set the variable also to your ADTF directory e.g.D:/ADTF/3.4.0.Avoid using admin-permission directories. This can cause CMake to fail due to missing permissions. -
Once again click the
Configurebutton -
Now you should get the "Configuring done" log message and you can click the
Generatebutton -
If everything is fine you get the "Generating done" log message. Click the
Open Projectbutton to start Visual Studio
Implement the Filter inside Visual Studio
Open the hello_world_filter project in the solution explorer which should look like this:

Open the hello_world_filter.h file and add this minimal Filter declaration:
#pragma once

// Include all necessary headers from the ADTF SDK
#include <adtffiltersdk/adtf_filtersdk.h>

// For simplicity use the necessary namespaces
using namespace adtf::util;
using namespace adtf::ucom;
using namespace adtf::base;
using namespace adtf::streaming;
using namespace adtf::filter;

// To implement a Filter we subclass adtf::filter::cFilter
class cHelloWorldFilter: public cFilter
{
public:
    // This macros provides some meta information about our Filter Implementation
    // This will be exposed by the plugin class factory.
    ADTF_CLASS_ID_NAME(cHelloWorldFilter,
                       "hello_world_printer.filter.adtf_guides.cid",
                       "Hello World Printer");

public:
    // In the constructor, we setup all aspects of our Filter.
    cHelloWorldFilter();

    // This method gets called when our Runner is triggered.
    tResult Process(tNanoSeconds tmTimeOfTrigger,
                    IRunner* pRunner) override;
};
Open the hello_world_filter.cpp file and add this minimal Filter definition:
#include "hello_world_filter.h"

// The code behind the macro creates a plugin and the main entries to the plugin DLL or shared object.
// The cHelloWorldFilter will be available through the plugins class factory.
ADTF_PLUGIN("Hello World Plugin",
            cHelloWorldFilter);

cHelloWorldFilter::cHelloWorldFilter()
{
    // Create our Runner and give the ADTF Configuration Editor a hint on which
    // Active Runner to connect to it. In this case a Timer Runner.
    CreateRunner("data_generator_function",
                 cTimerTriggerHint(std::chrono::seconds(1)));
    SetDescription("data_generator_function", "Runner to periodically trigger the function which prints the happy text");

    // set basic information about the component itself and purpose
    SetDescription("This filter shows how to trigger a cyclic log message.");
}

// Executes each time the data generation function Runner is stimulated (e.g. through a Timer Runner).
// This is where your logic has to be implemented.
tResult cHelloWorldFilter::Process(tNanoSeconds /* tmTimeOfTrigger */,
                                   IRunner* /* pRunner */)
{
    LOG_INFO("I am so happy :)");

    RETURN_NOERROR;
}
Build the "Hello World" solution with Visual Studio to get the shared object *.adtfplugin
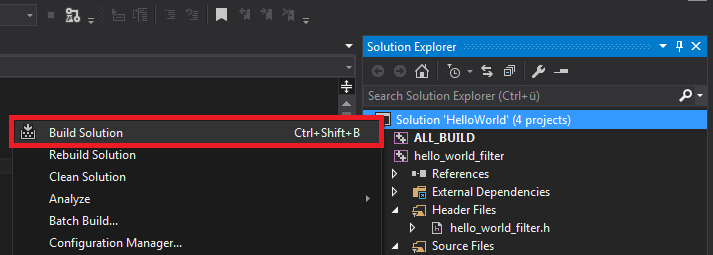
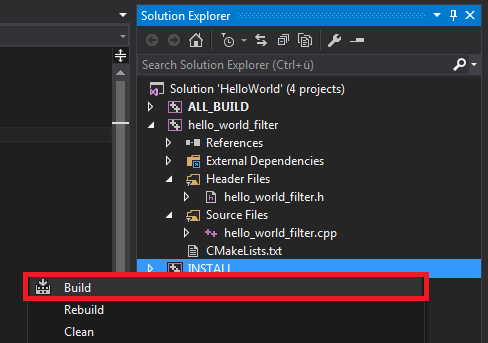
Build the "INSTALL" project with Visual Studio (this step deploys the created *.plugindescription files)
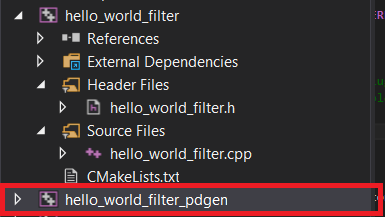
If the *.plugindescription file is missing. Try rebuilding the "hello_world_filter_pdgen" Project which installs the *.plugindescription
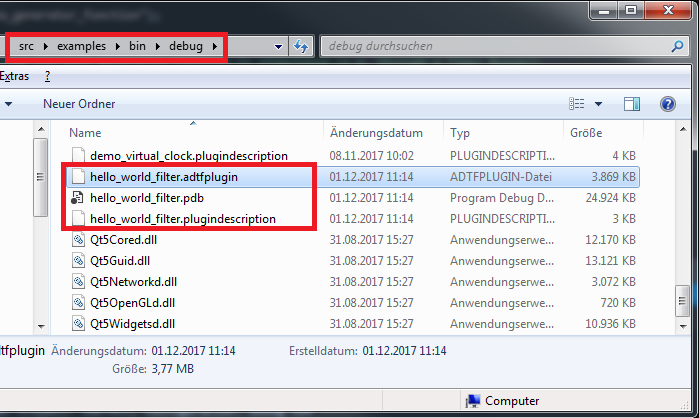
Now you have a brand new hello world Filter which logs "I am so happy :)" to the console when activated. You
can find the generated hello_world_filter.adtfplugin and hello_world_filter.plugindescription
in the src\examples\bin\debug directory of your ADTF directory.
Build an ADTF Session for our new Filter
Fire up the Configuration Editor
- Create a new project
- Drag and drop the
Hello World Filterfrom the Components tab into the Filter Graph - Drag and drop a
Timer Runnerinto the Filter Graph - Connect the
Timer Runnerwith theHello World Filter - Save the project ctrl + s
- Switch to the
Sessionstab - Right click on the default ADTF Session and choose
Launch with ADTF Control -
In the command line of the ADTF Control type
rl running

Filter output
Congratulations! Now you know the steps to construct an ADTF Filter from scratch.
Where to go next?
Have a look at Streaming Sources to learn where the data comes from that flows through the ADTF System.