Signal Provider Filter Tutorial
This guide covers creating a simple ADTF Filter that receives data samples and uses them to create signals which are then displayed in a signal view using the display toolbox. After reading this guide, you will know how to:
- install the display toolbox
- create and update signals
- add a signal view to your ADTF project using the Configuration Editor
Where are we?
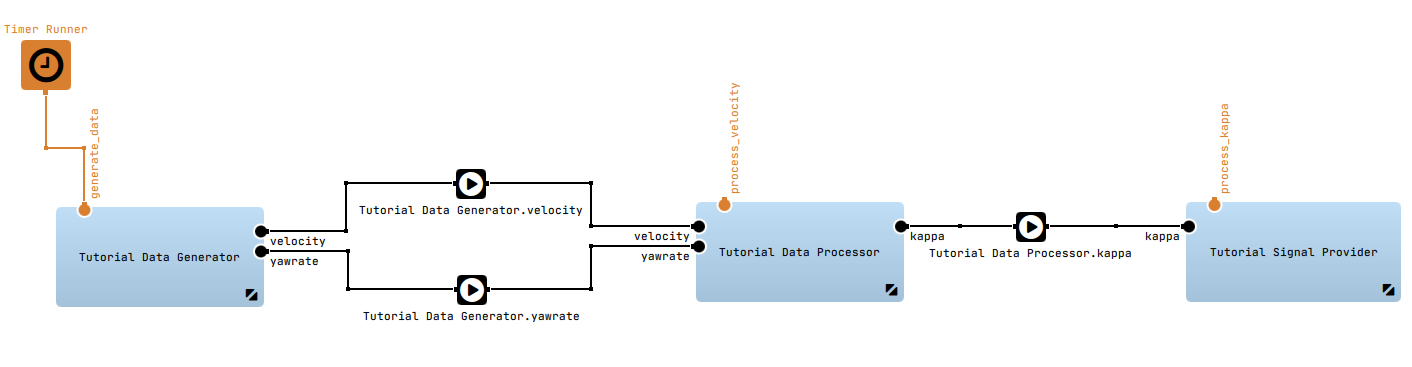
In Data Generator Filter Tutorial we created a Filter that can generate velocity and yaw rate data samples and forward them to a data sink. In Data Processor Filter Tutorial we created another Filter that takes velocity and yaw rate data samples, uses them to calculate a kappa value and logs some values to the console. In ADTF Project Tutorial we created a project with the Configuration Editor. The project contains an ADTF Session you can start with the ADTF Launcher. The ADTF Session references an ADTF Graph file which contains a Filter Graph that makes use of our two new Filters. Now we want to display these values in a signal view. We therefore need to implement a Filter that:
- receives the kappa values
- creates a signal
- updates the signal when new data is available
Where to install the Display Toolbox?
Either install the display toolbox into ADTF's addons folder
at ADTF_INSTALL_DIRECTORY/addons/ or install it in a custom
directory. The latter requires us to create a link from
the addons folder to the toolbox folder.
How to create the signal provider Filter?
Just like before we create an empty ADTF Filter using CMake. Here is an example CMakeLists.txt file for this purpose. It creates a Filter tutorial_filter_signal_provider.
cmake_minimum_required(VERSION 3.18 FATAL_ERROR)
project (SignalProvider)

set (SIGNAL_PROVIDER_FILTER tutorial_signal_provider_filter)

if(NOT EXISTS ${CMAKE_CURRENT_SOURCE_DIR}/tutorial_signal_provider_filter.h)
  file(WRITE tutorial_signal_provider_filter.h)
endif()
if(NOT EXISTS ${CMAKE_CURRENT_SOURCE_DIR}/tutorial_signal_provider_filter.cpp)
  file(WRITE tutorial_signal_provider_filter.cpp)
endif()

find_package(ADTF COMPONENTS filtersdk REQUIRED)
find_package(ADTF COMPONENTS systemsdk REQUIRED)

# Adds the tutorial_signal_provider_filter project to the Visual Studio solution, which when build
# creates a shared object called tutorial_signal_provider_filter.adtfplugin
adtf_add_filter(${SIGNAL_PROVIDER_FILTER} tutorial_signal_provider_filter.h tutorial_signal_provider_filter.cpp)

# Adds the INSTALL project to the Visual Studio solution, which when build
# copies our Filter to the subdirectory given as the second argument into ${CMAKE_INSTALL_PREFIX}
adtf_install_filter(${SIGNAL_PROVIDER_FILTER} src/examples/bin)

# Generate a plugindescription for our Filter
adtf_create_plugindescription(
    TARGET ${SIGNAL_PROVIDER_FILTER}
    PLUGIN_SUBDIR "src/examples/bin"
    VERSION "0.8.15"
    LICENSE "ADTF"
    SUPPORT_MAIL "support@mycompany.org"
    HOMEPAGE_URL "www.mycompany.org"
)

# Generate a documentation for our Filter
adtf_convert_plugindescription_to_dox(
    TARGET ${SIGNAL_PROVIDER_FILTER}
    DIRECTORY ${CMAKE_BINARY_DIR}/src/doxygen/generated
)
For further information on how to use CMake have a look at CMake Tutorial. Open the tutorial_filter_signal_provider header and source files in Visual Studio.
The header file of the Filter
Our base header file looks similar to our previously created header files.
Additionally we need to inherit from ISignalRegistry::ISignalProvider::IEnabledSignals.
This helps us to enable/disable signals.
/**
 *
 * ADTF Tutorial filter for data processing
 *
 */
#pragma once

// Include all necessary headers from the ADTF SDK
#include <adtffiltersdk/adtf_filtersdk.h>
#include <plugins/signal_registry_intf.h>

#include <mutex>
#include <unordered_set>

// For simplicity use the necessary namespaces
using namespace adtf::util;
using namespace adtf::ucom;
using namespace adtf::base;
using namespace adtf::streaming;
using namespace adtf::mediadescription;
using namespace adtf::filter;
using namespace adtf::services;

// Now we declare a new class cTutorialFilterSignalProvider that
// inherits from cFilter. This will be our Tutorial Filter.
// We also implement IEnabledSignals to react to signal requests.
class cTutorialFilterSignalProvider final :
        public cFilter,
        public ISignalRegistry::ISignalProvider::IEnabledSignals
{
public:
    // Inside the class declaration we use an ADTF macro to enable correct treatment
    // of class identifier and class name by IClassInfo and the class factories.
    ADTF_CLASS_ID_NAME(cTutorialFilterSignalProvider,
                       "tutorial_signal_provider.filter.adtf_guides.cid",
                       "Tutorial Signal Provider");

    // Inform the tools that we require an service that provides the Signal Registry interface.
    ADTF_CLASS_DEPENDENCIES(REQUIRE_INTERFACE(adtf::services::ISignalRegistry));

public:
    // We implement the constructor where we create our Pins.
    cTutorialFilterSignalProvider();

    // We override the Init method in order to access the Signal Registry Service
    // And our instance name.
    tResult Init(tInitStage eStage) override;

    // We override the ProcessInput method, that we configure to be called each time a trigger occures via one input Pin.
    tResult ProcessInput(ISampleReader* pReader,
                         const iobject_ptr<const ISample>& pSample) override;

    // this is called when the first consumer requests a signal to be generated.
    tResult EnableSignal(ISignalRegistry::tSignalID nSignalID) override;

    // this is called when the last consumer cancels its requests for a signal to be generated.
    tResult DisableSignal(ISignalRegistry::tSignalID nSignalID) override;

private:
    // Reader to read data samples from our input Pin.
    ISampleReader* m_pKappaReader;

    // this guards conncurrent access to m_oEnabledSignals
    std::mutex m_oEnabledSignalMutex;

    // this store the ids of all requested signals
    std::unordered_set<ISignalRegistry::tSignalID> m_oEnabledSignals;

    // pointer to our Signal Provider instance.
    // must be the first member to destroy.
    // every method on this class can still be called until m_pProvider has completed destruction!!!
    object_ptr<ISignalRegistry::ISignalProvider> m_pProvider;
};
The source file of the Filter
Now we need to implement the tutorial_filter_signal_provider.cppsource file.
/*
 *
 * ADTF Tutorial Filter for data processing
 *
 */
#include "tutorial_signal_provider_filter.h"
#include <cinttypes>

// The code behind the macro creates a plugin and the main entries to the plugin DLL or shared object.
// The cTutorialFilterDataProcessor class will be available through the plugins class factory.
ADTF_PLUGIN("ADTF Tutorial Signal Provider Plugin", cTutorialFilterSignalProvider);

cTutorialFilterSignalProvider::cTutorialFilterSignalProvider()
{
    // create our input
    m_pKappaReader = CreateInputPin("kappa", stream_type_plain<float>());
    SetDescription("kappa", "Incoming value to provide for Signal Registry");

    // set basic information about the component itself and purpose
    SetDescription("This filter shows how to provide content for Signal Registry.");
}

tResult cTutorialFilterSignalProvider::Init(tInitStage eStage)
{
    // do not forget to call the cFilter Implementation of this method.
    RETURN_IF_FAILED(cFilter::Init(eStage));

    // in stage normal we can perform long running initializations
    // and access property values.
    if (eStage == StageNormal)
    {
        // get the Signal Registry interface from the runtime
        object_ptr<ISignalRegistry> pSignalRegistry;
        RETURN_IF_FAILED_DESC(_runtime->GetObject(pSignalRegistry),
                              "Unable to aquire the Signal Registry Interface");

        // we create a provider with our name
        RETURN_IF_FAILED(pSignalRegistry->CreateProvider(get_named_graph_object_full_name(*this),
                                                         m_pProvider));

        // and add a single signal
        RETURN_IF_FAILED(m_pProvider->AddSignal({0,
                                                 "kappa",
                                                 "",
                                                 "kappa values",
                                                 0.0, 5.0},
                                                 this));
    }

    RETURN_NOERROR;
}

// This function will be executed each time a trigger occurs via the "kappa" input Pin
tResult cTutorialFilterSignalProvider::ProcessInput(ISampleReader* /*pReader*/,
                                                    const iobject_ptr<const ISample>& pSample)
{
    std::lock_guard<std::mutex> oGuard(m_oEnabledSignalMutex);
    if (m_oEnabledSignals.find(0) == m_oEnabledSignals.end())
    {
        // in case nobody requested a signal from us, do nothing.
        RETURN_NOERROR;
    }

    // Once again use sample_data to access the data.
    sample_data<float> fKappa(pSample);

    // And update our signal value.
    RETURN_IF_FAILED(m_pProvider->UpdateSignal(0, {fKappa.GetTimeNs(), fKappa}));

    RETURN_NOERROR;
}

tResult cTutorialFilterSignalProvider::EnableSignal(ISignalRegistry::tSignalID nSignalID)
{
    // the registry will never request a signal that we do not provide
    // we check it anyway.
    if (nSignalID != 0)
    {
        RETURN_ERROR_DESC(ERR_INVALID_ARG, "There is no signal with ID %zu", nSignalID);
    }

    // insert it into our active set
    std::lock_guard<std::mutex> oGuard(m_oEnabledSignalMutex);
    m_oEnabledSignals.insert(nSignalID);
    RETURN_NOERROR;
}

tResult cTutorialFilterSignalProvider::DisableSignal(ISignalRegistry::tSignalID nSignalID)
{
    // remove it into from our active set
    std::lock_guard<std::mutex> oGuard(m_oEnabledSignalMutex);
    m_oEnabledSignals.erase(nSignalID);
    RETURN_NOERROR;
}
Finally build and install the Project with Visual Studio to get the binaries.
Project integration
We use our previously created ADTF Project
and extend the functionality with a signal configuration. Therefore we need to select
the Tools menu and open the Options dialog and extend
the entry Plugin directories by adding the directories where the filters
(and their describing *.plugindescription files) are located. If you need help read
the Options section.
The next step is to add missing Services.
Have a look at the System Editor
and add the following Services (their starting run level must be set to System):
- signal_registry.service.adtf
- qt_xsystem.ui_service.adtf
- signal_scope_view.ui_service.disptb
- signal_table_view.ui_service.disptb
- signal_tree_view.ui_service.disptb
Now we can add a Tutorial Filter Signal Provider to our
Filter Graph. We want it to receive modified data samples from our
Tutorial Filter Data Processor so we connect both Filters (Sample Stream will be added automatically since ADTF 3.7.0).
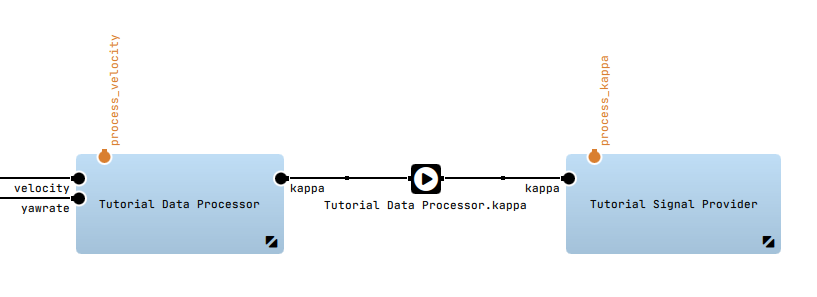
We finished integrating the signal provider in our ADTF project.
Now we want to run our modified ADTF Session and have a look at our signal.
Display the signal
You can start the ADTF Session with the ADTF Launcher.
adtf_launcher.exe --session "PATH\TO\YOUR\PROJECT\adtfsessions\default_session.adtfsession" --run --console
Because we added the qt_xsystem.ui_service.adtf UI Service, ADTF will initialize a kind of
Window Manager Service which is capable of arranging multiple sub windows.
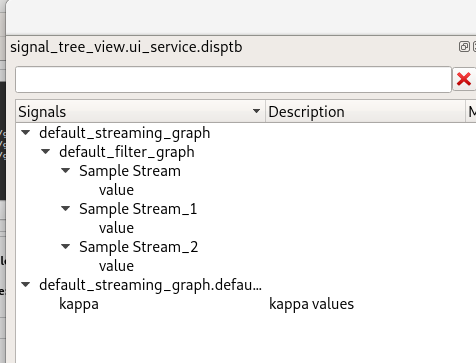
The previously addedsignal_tree_view.ui_service.disptb UI Service
adds a expandable tree view of available signals that can be dragged into the other displays.
Thesignal_scope_view.ui_service.disptb UI Service provides a sub window where
signals can be dropped. The values of the signal are displayed in a time series chart.
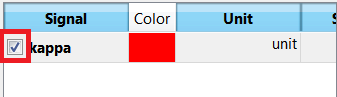
To see the signals in the chart they must be activated by a checkbox next to text label of the signal.
The signal_table_view.ui_service.disptb UI Service provides also a sub window where
signals can be dropped. The values of the signal are displayed in a table view.
signal_tree_view, signal_scope_view and signal_scope_view by right clicking in the window.
Now we need to add our kappa signal to the signal_scope_view.
We can just drag'n drop it from the signal_tree_view into thesignal_scope_view.
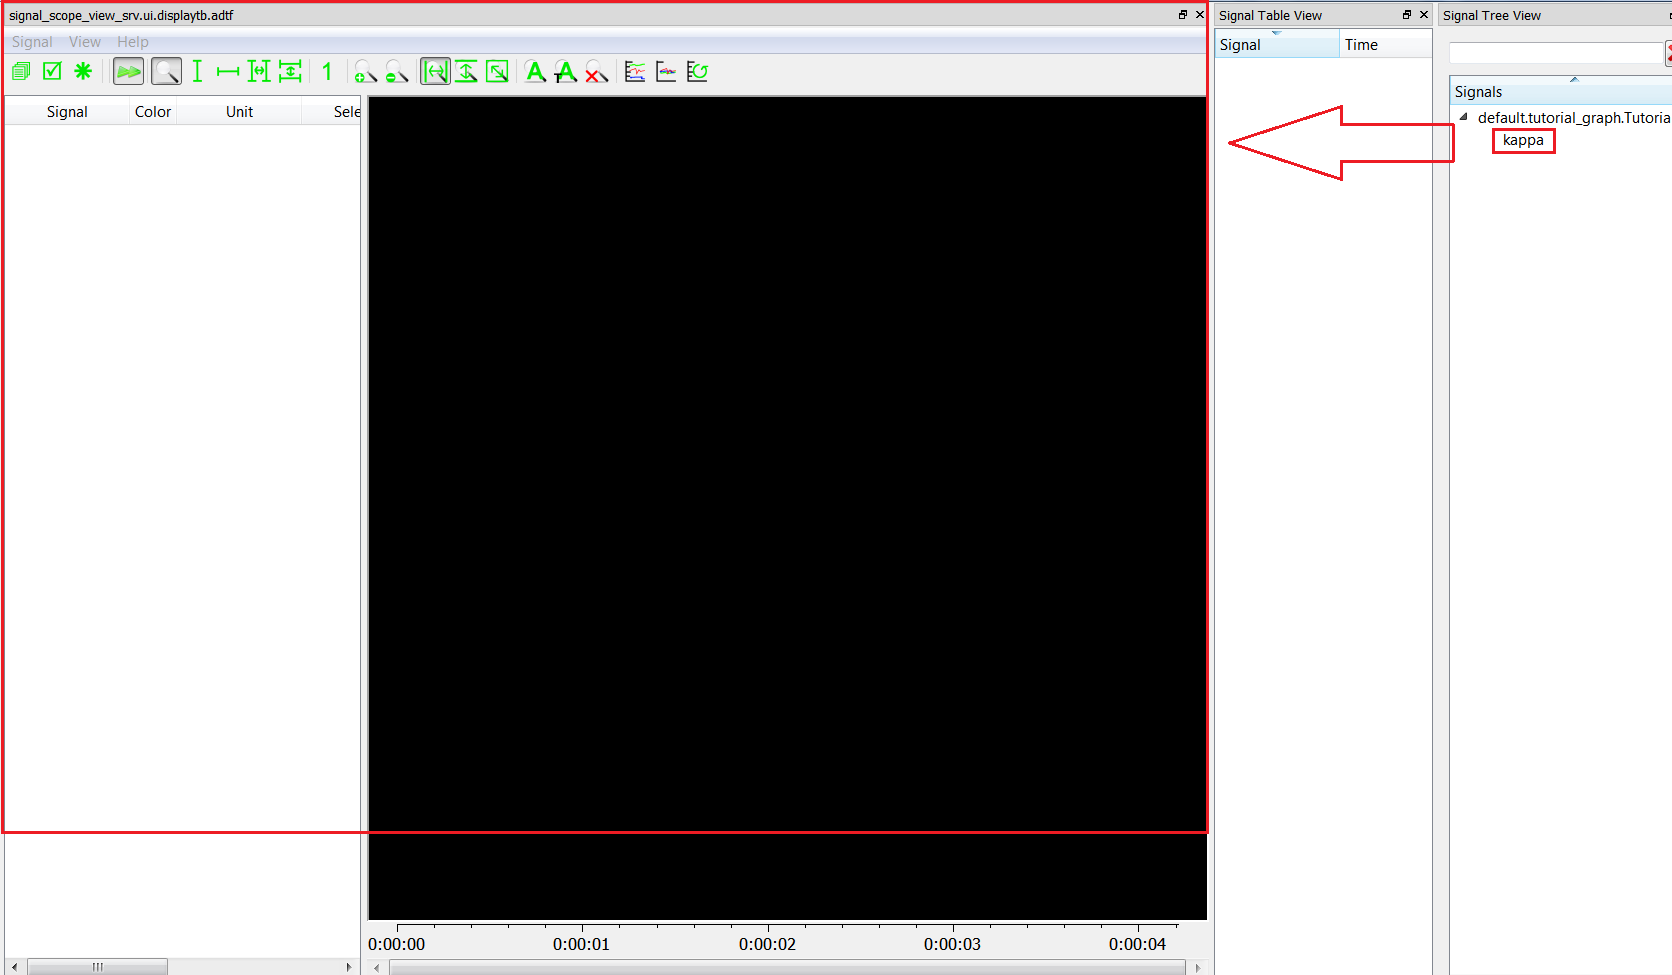
signal_scope_view remains empty
check whether your signal is activated.
If you added the signal "kappa" to the signal_scope_view and the signal_table_view
you should see a display layout that looks like this:
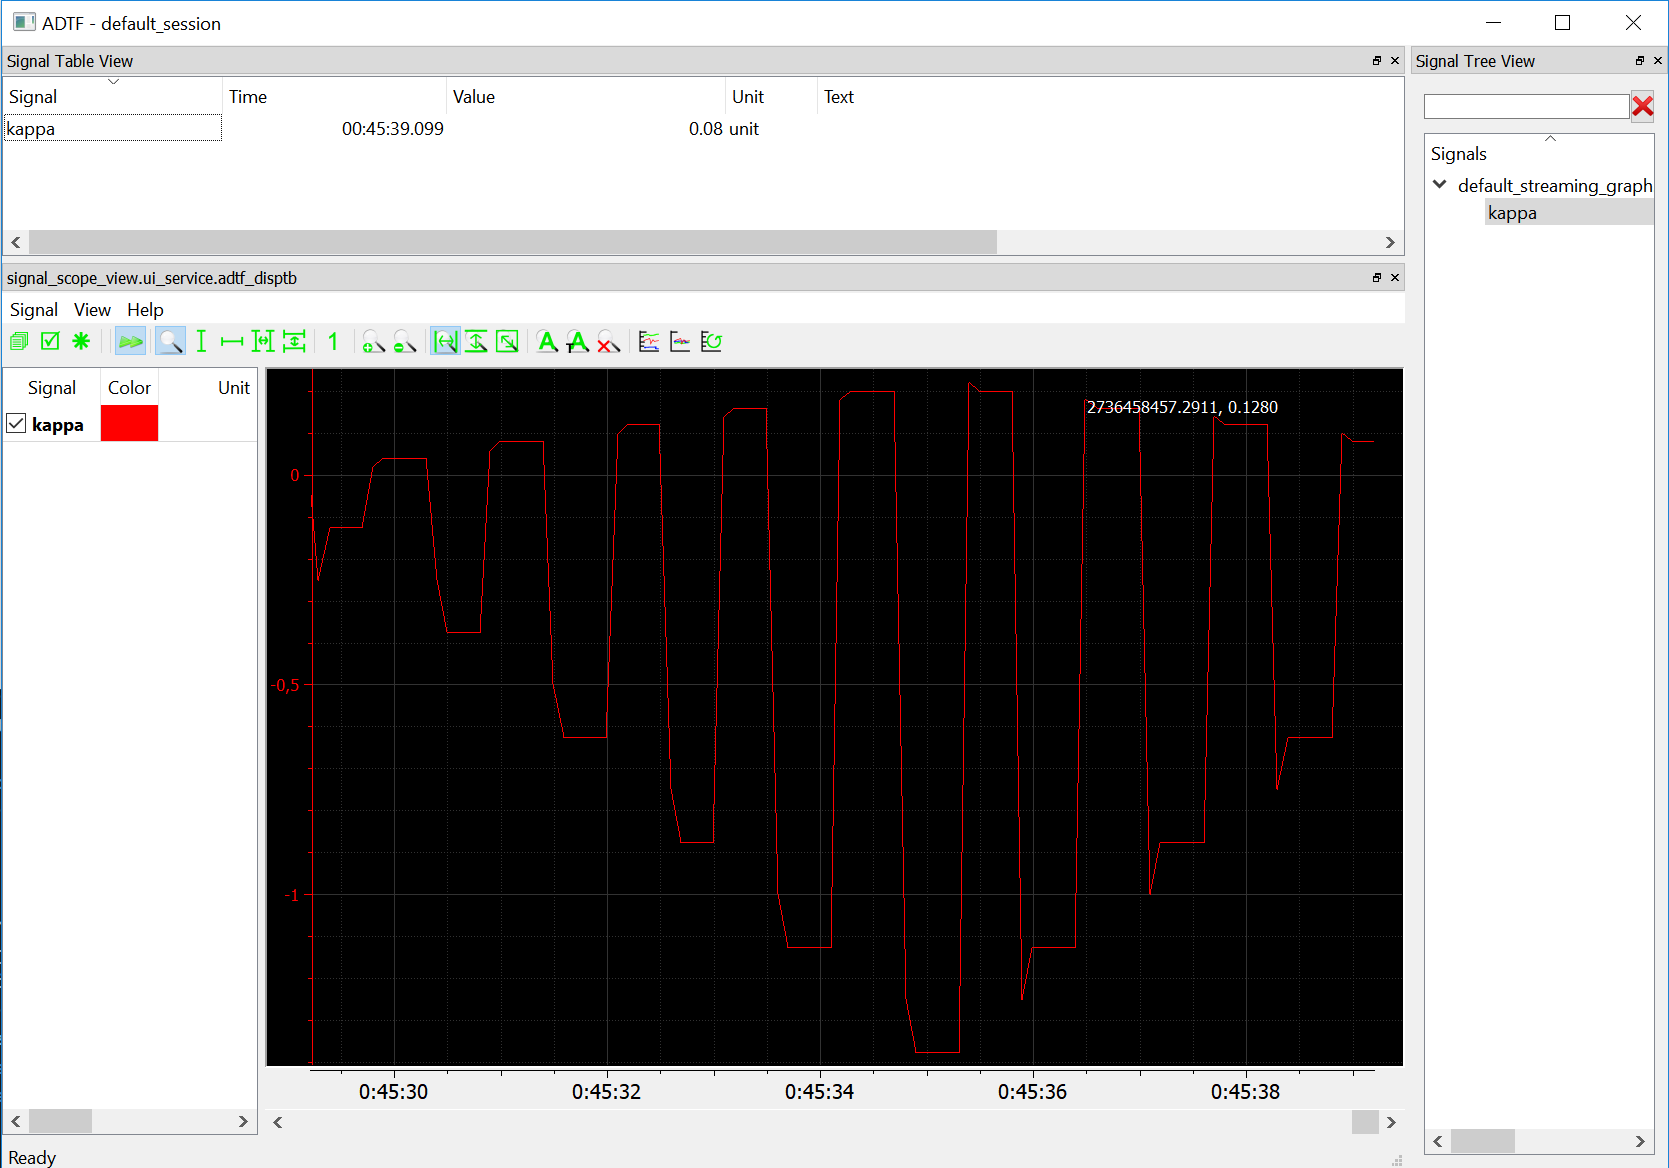
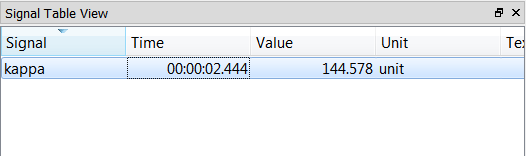
signal_table_view we can see it's current value and unit.
Convert data samples into signals automatically
Because it would be very tedious to write a signal provider for every data sample there is
a convenient short cut. ADTF offers an ADTF Service called Media Description Service which is
part of the ADTF default delivery. This ADTF Service is capable to convert data samples into signals.
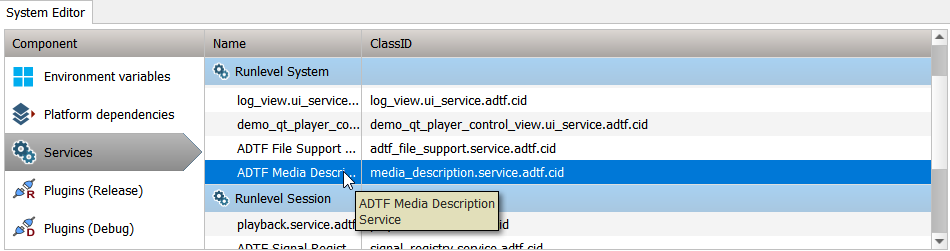
To test this automated conversion we just need to go to the
System Editor of the Configuration Editor and add the Media Description Service. Because
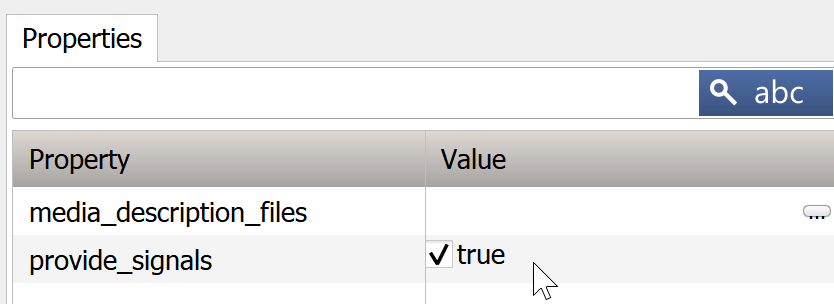
this feature of the ADTF Service is turned off by default we have to turn it on. To do so click on Properties
button in the row of the Media Description Service and set the attribute provide_signals
to true after that hit ctrl + S to save the project.
After stopping the ADTF Launcher and doing a restart we can see three new
signals in addition to our manually created signal kappa.
The ADTF Service checks all data connection of the Filter Graph and asks for the stream type.
If the stream type provides a Media Description the ADTF Service tries to provide its data elements
as signal values.
In our case the stream_type_plain<tFloat32> defines a Media Description for us.
The signal names are the element names in the according mMedia Description.
If we drag'n drop the signals into the signal_table_view and run
the ADTF Session we can see the velocity, yaw rate and kappa values.

Where to go next?
Have a look at the Qt5 JavaScript Filter for rapid prototyping.